It is dangerous to climb or walk on your roof, so only do it if you accept the liability in case of injury. Consider calling an insured roofing contractor instead.
Table of contents
- Steps to Build a Porch Roof
- Step One: Obtain Permits
- Step Two: Decide on Roofing Materials
- Step Three: Take Measurements
- Step Four: Install Rafter Plate
- Step Five: Install Rafter Hangers
- Step Six: Place Columns
- Step Seven: Prepare Columns
- Step Eight: Attach Header Beam
- Step Nine: Cut and Install Rafters
- Step Ten: Lay Roof Sheathing
- Step Eleven: Lay Underlayment
- Step Twelve: Lay Roofing Material
Having a porch attached to your home is a great way to enjoy the great outdoors. But sometimes, Mother Nature can prevent you from doing so. That’s why it’s nice to have a porch roof over your outdoor living space. Wondering how to build a porch roof? It’s possible to do on your own, but only if you have the right tools – and enough prowess – to get the job done right.
The most common type of porch roof is a lean-to type of roof that’s attached to the side of your home. Despite the simplicity of this type of roof, building a porch roof is not for the faint of heart: it’s an advanced job that should only be attempted if you have experience building with wood and working with a variety of power tools.
If you decide to attempt to build a porch roof as a DIY project, be sure to carefully study the plans you’ve chosen and gather a team of friends or helpers who are able-bodied and also have experience with construction.
In this blog post, we’ll take you through the steps you’ll need to follow if you’re wondering how to build a porch roof.
Steps to Build a Porch Roof
Follow these steps if your porch requires a simple, lean-to type of porch roof. If your porch requires (or if you prefer) a more intricate type of roof for your porch, it’s best to find a roofer who can handle this complex installation.
Step One: Obtain Permits
An in-depth project like adding a roof to your home’s porch is likely to require a permit from your town or county. Learn about local building codes in order to understand what type of permits you need to pull before getting too deep into your porch roof project. Some homeowners wonder why this step is important, thinking, “well, no one will notice!” While this might be the case, remember that insurance won’t cover a claim for work that’s not permitted and up to code. So if anything were to happen to your porch roof down the line, you’ll be solely responsible for any expenses incurred.
Step Two: Decide on Roofing Materials
Before diving into your porch roof project, you’ll need to decide what you want your porch roof to look like. What type of roof are you looking for? How far should it extend from your home? What type of roofing material will you need? You can pull blueprints or use an app like Pinterest to help you with inspiration for your porch roof project.
Step Three: Take Measurements
To begin with, you’ll need to measure the rise and run of your roof. This will help you determine how long your rafters need to be, and the slope of your new roof. Additionally, checkout our roof pitch calculator to make sure the pitch you’re using isn’t too far off from the natural slope of your roof.

Step Four: Install Rafter Plate
The rafter plate is the long piece of wood that will be anchored to the wall of your home’s exterior. This should be the highest point of your roof, which will slope downward from the plate. Another word for this piece is a ledger board. Be sure to measure twice, because you’ll need to start by removing your home’s siding at the point where the rafter plate attaches to the side of your home. This point should be at least three inches below any windows.
Step Five: Install Rafter Hangers
Metal rafter hangers should be evenly spaced on the ledger board. Begin by installing one at each end in order to determine how far apart the hangers should be attached.
Step Six: Place Columns
You’ll need to dig holes to place your roof’s columns in the ground. There should be one column at each end in order to anchor the roof, and the rest should be evenly spaced. Be sure to leave space for a staircase if your porch is elevated. The hole for your column should be at least a foot deep for stability. Fill the bottom four inches with gravel, then you’ll pour and cure concrete once you’re absolutely certain your columns are in the right place.
Step Seven: Prepare Columns
With your roof’s pitch in mind, you’ll need to use a circular saw to cut notches in the tops of your columns in order for them to support the header beam.
Step Eight: Attach Header Beam
A header beam is a board that runs from the rafter plate to the column. It adds support to the porch’s roof and allows for proper distribution of weight. Use lag screws and washers to attach your header beams to the columns using the notches you cut in step 7.

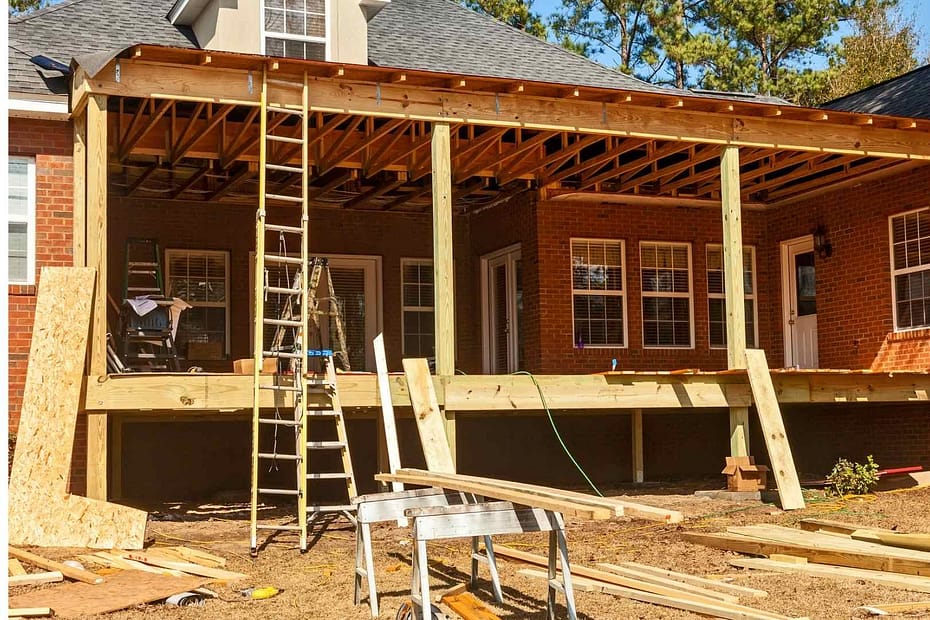
Step Nine: Cut and Install Rafters
Rafters are boards that run opposite the header beam. These will be the foundation for your roof decking, on top of which lies the underlayment and ultimately, the roofing material you’ve chosen for your porch roof. Before installing your rafters, you’ll have to use a saw to make special, precise cuts according to your measurements and the pitch of your roof. These intricate cuts can be one of the most challenging parts of the process of how to build a porch roof.
Step Ten: Lay Roof Sheathing
These are the large, flat plywood pieces that become your porch roof’s decking. They should be laid on top of the rafters.
Step Eleven: Lay Underlayment
Felt and rubberized asphalt are both popular options for underlayment. Almost all types of roofs require underlayment to protect the roof decking from moisture.
Step Twelve: Lay Roofing Material
This step will look a bit different depending on what type of roofing material you choose for your porch roof. Metal roofs will need rivets and fasteners, while asphalt shingles are nailed into the roof decking. When ordering material, remember to order a bit extra for end pieces.
When thinking about how to install a porch roof, one of your top considerations might be the cost. After all, even a small roof is a major home improvement project! If you’re at all unsure about whether you can complete this type of job on your own, it might be best to hire a professional. Need a ballpark price for the work? Start by using Instant Roofer’s roofing calculator to get a sense for the budget you need to establish for this type of project.
Fact Checked by Christin Perry 9/10/2024